Tuesday, August 12, 2008

It's been gloomy today... Great day for crafting... I was inspired by Laura's Sketch over @ 2S4Y blog. I used some of the stuff that i've just received in the mail yesterday from ebay... There are sure some great scrapbook deals. I've bought 8 packs of assorted felt by Queen&co. and crocheted flowers... my favorite was the crochet flowers... I want to learn japanese crochet! just cause they're designs are very cute...

Anyways... Here's my card for the day!

Happy Crafting!

Laura's sketch 6 @ 2S4Y blog


Supplies:
Cardstock: Bazzill
P.Paper: Fancy Pants, upsydaisydesigns, scenicroute
Rub-on: Rhonna Farrer
Felt: Queen&Co.
Ink: Colorbox
Bling: Me&mybigideas
Flower: Ebay
Others: Sewing floss, beads, hemp.


17

Sunday, August 3, 2008

My attempt on Laura's sketch for caardvarks... I hope I get in on time...

Supplies:
Cardstock: bazzill, creative imaginations
P.paper: my mind's eye
Ribbon: making memories
Rhinestone: me&mybigideas
Rub-on: creative imaginations
Flower: Ka jinker
ink: colorbox


3

What?! Yep... That's what I thought when I saw my card was picked card of the week @ 2S4Y blog. There was a lot of great cards that were made.. And I was so so surprised! I'd like to thank everyone in 2S4Y and the sponsor, Sakura of America.

Card of the month {sketch#5}


Here's a peek of what I'm getting....


Happy crafting!
Liv.
1

Saturday, August 2, 2008

Requested by Raquites... Taking the pictures sure take a lot of time... But I like Visual Instructions better. I've made some changes to the template to make it easier. Added a sleeve template and sentiment that I used in the card.

When selecting which p.paper to use on this project. I would recommend a thicker double sided P.paper just to give a little more sturdiness. Enjoy!

Supplies:
P.Paper: Scenic Route
pen: staedler
eyelet & brad: Making Memories

Lace ribbon: Daiso


*NEW* Template:


Instructions:
1. Cut out and outline/distress all the pieces.


2. Glue together the mug cover.


3. Adhere just the edges using a double sided tape.


4. Adhere the mug cover with an eyelet.


5. Adhere the Sleeve. (Front and back)


6. Tie ribbon around the sleeve.


7. adhere brad on the sides and pop-dots behind.


8. Adhere to card.
2

Friday, August 1, 2008

Oh it's Friday already! time flies... Made this card last night for the 2S4Y sketch...

Supplies:
Cardstock: Bazzill, creative imaginations
P.paper: crate paper, scenic route, Bobunny
Rub-On: Basic grey, Rhonna Farrer
Flower: Prima
Button: Autumn Leaves
Others: hemp?, sewing thread, lace thread


19

Thursday, July 31, 2008

I was inspired by CPS blog on creating shaped cards...
Love how my coffee mugs turned out! Perfect for placing starbucks gift cards for your loved ones. For the cup shape, I used a image of a mug and traced it in illustrator. But, if you're not good with the program, you can just print out an image and trace it out...
Oh.. and I don't have a starbucks gift card so i put sth else instead... haha..

Just for You gift card
Supplies:
P.Paper: Tre's Jolie's
pen: staedler
eyelet & brad: Making Memories
Lace ribbon: Daiso
magnet: Basic Grey


Thank You gift card
Supplies:
P.Paper: Tre's Jolie's, Cosmo Cricket, Making Memories
Ink: Colorbox Chalk
Flower: Prima, Kelly Panacci

Button: Autumn Leaves
Rub-on: Basic Grey
Floss: Karen Foster
Lace Ribbon: Daiso


Templates
15

Wednesday, July 30, 2008

A Notebook and card set (CPS#75), it'll make a nice gift for mothers...
Found a recycled book over at Daiso, Richmond BC @ Aberdeen Center. It's kind of like the dollar store, their stuff are all from Japan, $2. You can find just about anything.. Quality is so much better, you'll be amazed at what they have there... household items, stationery, crafting supplies, gardening decor, Children's toys.

For those people who live in Vancouver, BC. Go Check IT OUT!!

4

Friday, July 25, 2008

It was a box that i bought at the dollar store.. I figured it'll make a cute keepsake box.
It's very cute and glittery.. I LOVE Glitters!! I try to add them to my cards now whenever I get the chance too.

Supplies:
Cardstock: Bazzill Bling(Pink)
P.Paper: Imaginisce, DCWV
Flower:Prima
Brads: Bazzill, MOD, MakingMemories
Glitter: Doodlebug
Stamps: Imaginisce
Buttons: Autumn Leaves
ink: Colorbox
Ribbon: Making Memories, American Crafts, white lace(Daiso)
Others: Scallop Scissors


0

Wednesday, July 23, 2008

My attempt on a CPS sketch #74. It's so exciting! I've seen other creative people making really awesome cards.... wish me luck...


Supplies:
Cardstock: Doublemate(cream), bazzill(pink)
Patterned Paper: My Mind's Eye, Creative Imaginations
Ink: Colorbox
Felt Flower: KaJinker
Buttons: Autumn Leaves
Rub-On: Basic Grey
Others: scrapper's floss(chatterbox)
Glitter pen(Gellyroll)
Flower office sheers(MayaRoad)
2

Tuesday, July 15, 2008

Well Hello everyone! I know I've dissapeared for quite a while.. pretty busy i guess..

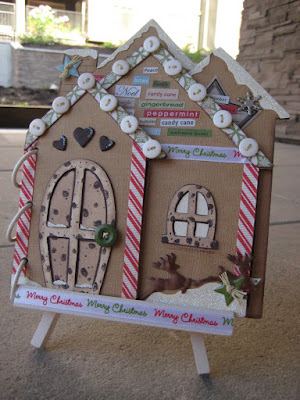
The long awaited gingerbread house. I was just preparing for xmas.. I know summer's just begin but I wanted to finish this up and hopefully sell them. The house shape was traced from clear scraps acrylic house album and I cut them out from chipboard.

At first I doubt myself that it'll look nice... But now with the finished piece, I LOVED it! I drew and handcut most of the embellishments like the chocolate chip door and window; snow; christmas tree and ofcourse the gingerbread man! he's a cutie..

So here's the gingerbread house... Taa daa!


5

Thursday, April 17, 2008

Ohhhhhh... I can hardly wait till the end of the month... Coz I'm gonna be MOVINGGGG!!! The new place just blows me away.... SO MUCH better than my place right now... Let me tell you the diff...

My current place:
It's a 3 bedroom + 1 Bathroom.
It's split into 2 floors so the Kitchen and my Housemates room are on the 1st floor.. and the other 2 bedroom and bath is on the 2nd..
So it's such a pain for me to go downstairs just to get a glass of water(especially at night). Same thing for my roomies... they have to climb the stairs to go to the bathroom..
We have no Insuite laudry, and have to go to the laundromat once every week..
The kitchen has a corner sink which is giving my back a hard time.
My cabinet door does not close.. Now don't ask me why i moved to this place...
It's a longgg storyyy...

But anyways..
My NEW place is gonna have a big kitchen, dishwasher, washer and dryer and 2 bathrooms!!! Plus++++ Everything is brand newww!! the place is so much brighter and less depressing..
I'm going to decorate my room... I bought 4 sheets of 12x12 paper(orange and green) and i'm going to stick them to a canvas board and hang them in my room.. I'll post it up once i've made themm...

ALL I CAN SAY IS THAT I'M SUPER DUPER EXCITEDDDD!!

So here's my cards for today...

Another "owl card" I love this stamp...


Birthday cards...
1

Friday, April 11, 2008

Card of the day!


0

Monday, April 7, 2008

Ok here's a pic of the Spring Tag that i'll be teaching this thursday @ Remember Me SB.. It'll be my 1st time teaching but i'm so excited.. I hope i dont mess things up.. Wish me luck!


1

Friday, April 4, 2008

Phew! Finally I have some time to update the blog...
Made quite a few cards that i haven't had a chance to take a picture of them until today..

Next week I'm going to be teaching my 1st class at Remember Me! It'll be A "Spring" Acrylic Tag Album and so far I have 4 people that have signed up.. I'll take a picture of it tomorrow and upload it for everyone to see.. I just bought an "Owl" stamp by Inkadinkado... He's so CUTE!


"WhoOo LoVes YoU?" card.

Supplies:
Cardstock: Bazzill.
Patterned Paper: Scenic Route (Laurel Marsh Haven Lane).
Pen: Zig (Evergreen).
Font: Britannic Bold.

Stamp: Inkadinkado (Owl).
Bling: Hero Arts.
Card Size: 5 1/4" x 4 1/4"


Instructions:
1.
Make Base Cardstock.
2. Trim around the leaf. (leave the bottom part).
3. Cut the reverse side of the P.paper slightly smaller than the base card.
4. Adhere both P.paper to base cardstock.
5. Stamp the "Owl" image.
6. Add Bling.
7. Print and adhere "Whooo loves you?"
8. Draw the stitch lines.
Note: Make sure both P.paper lines are alligned.

My other cards...


"Celebrate" card. (Made this for a friends B'day..)


"Dancing Penguin" card.


"B'day Wishes" card.


"Happy Owl" Card.


"Thank You" card and All occasion.


"Mother" card.
1